

Does Cascade Server Have A Max Upload File Size?
A low WordPress upload size limit stops you lot from uploading large files, plugins, and themes. If y'all're building a media-heavy website, that tin can be a considerable obstruction. It'south necessary to increment the max upload size in WordPress or your server (or both) in such cases.
Depending on your hosting provider and server, there are many ways to go about solving this issue. We'll cover them all in this article and prove you how to increase the maximum upload size in WordPress quickly.
Let's dive in!
Prefer to watch the video version?
What Is the Maximum Upload Size in WordPress?
Uploading large files to a server consumes a lot of the server'south resources. To prevent users from causing server timeouts, the default maximum upload size in WordPress typically ranges from 4 MB to 128 MB. Usually, the hosting provider sets this limit at the server level.
WordPress also includes constants that define this limit, but they cannot override the server-level settings in most cases.
To verify this, go to your WordPress site's Media Library. Here, try to upload a file that crosses this maximum upload file size limit. You'll meet an mistake message that looks something like this:
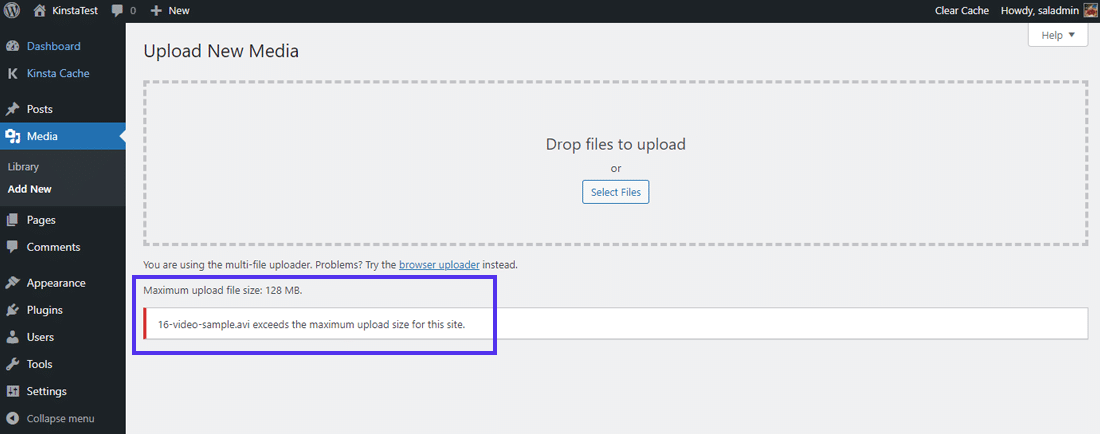
The "exceeds the maximum upload size for this site" error can be frustrating, but information technology exists for two main reasons: security and efficiency. Information technology hinders site owners and other users, including malicious actors, from uploading huge files (e.g. high-resolution images, large videos).
Otherwise, information technology tin result in incapacitating your website'south server, making your site come to a clamber. Or worse, information technology can bring your site down birthday!
How to Check the Current Maximum Upload Size in WordPress
There are many ways to check your WordPress site's current max upload size. Let's get through all of them.
In the Media Library
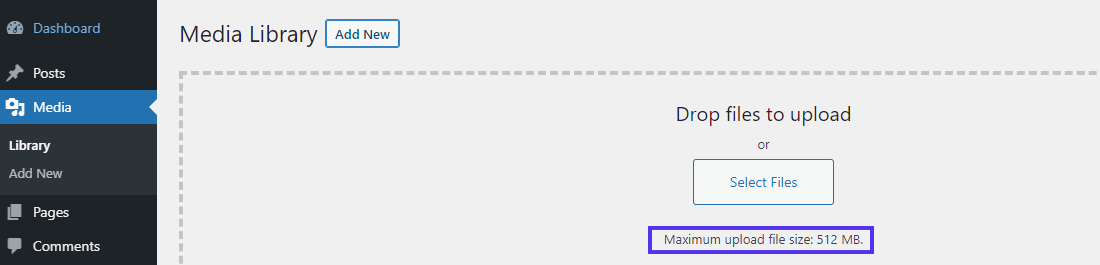
The quickest way to check your site's electric current maximum upload size is to go to your WordPress dashboard, and from in that location, become to Media > Library. Hither, click on the Add together New button to activate the media uploader tool.
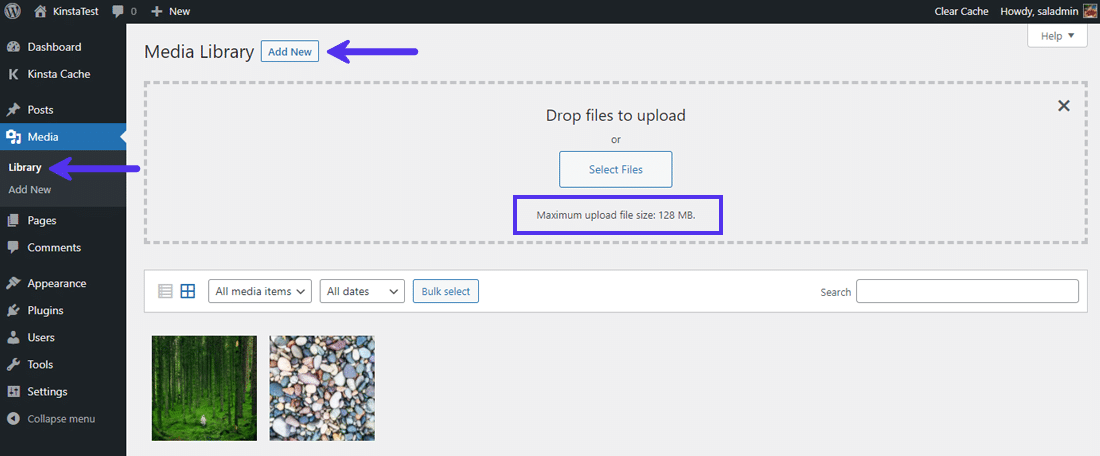
Equally Kinsta hosts this site, the Maximum upload file size: 128 MB. message displays below the Select Files button. If you're using a different web hosting provider, yous may see a dissimilar limit listed here.
You tin also get to Media > Add together New directly and run into the same message displayed at the bottom.
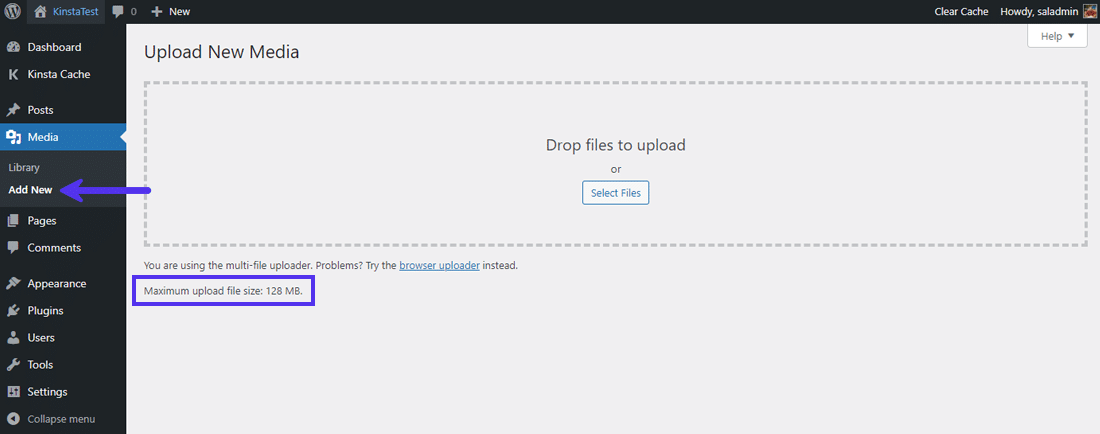
Once more, you can see the 128 MB max upload file size hither.
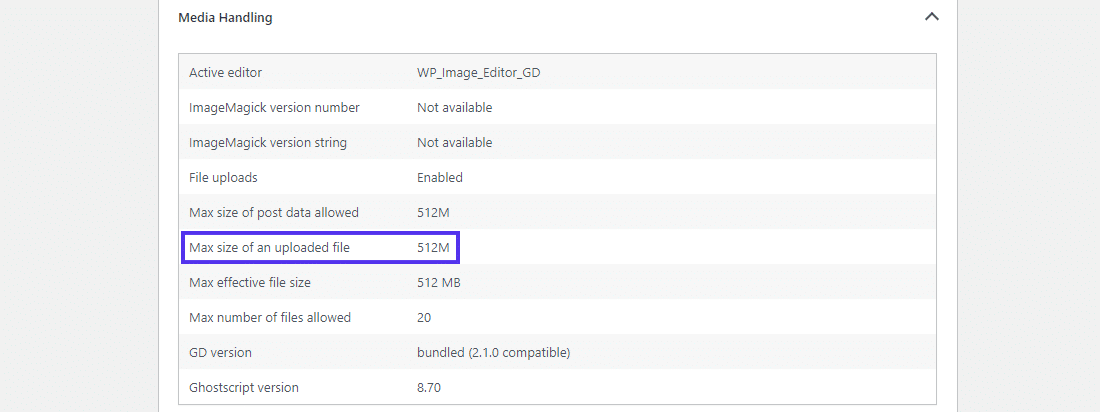
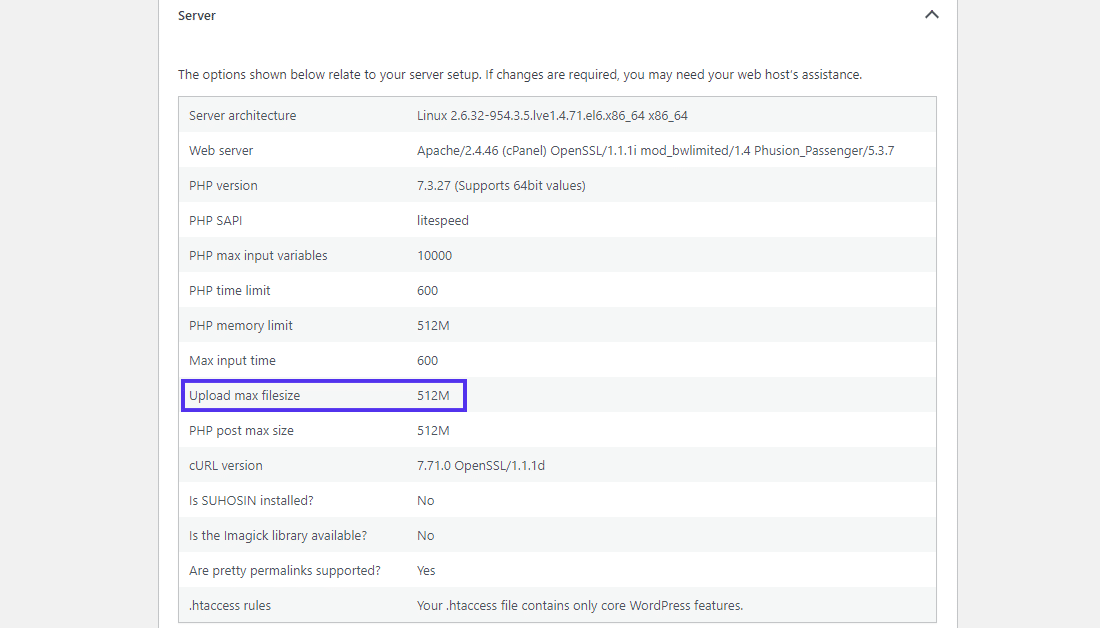
In the Site Health Info
WordPress 5.2 added the Site Health Info tool to help you debug your WordPress site better. Here, you tin find almost all the information about your server and WordPress configuration.
As both the server and WordPress handle the max upload file size, there are 2 ways to find its value on this screen.
Kickoff, you can find it listed under the Media Handling dropdown. Here, look for the value of Max size of an uploaded file abiding.
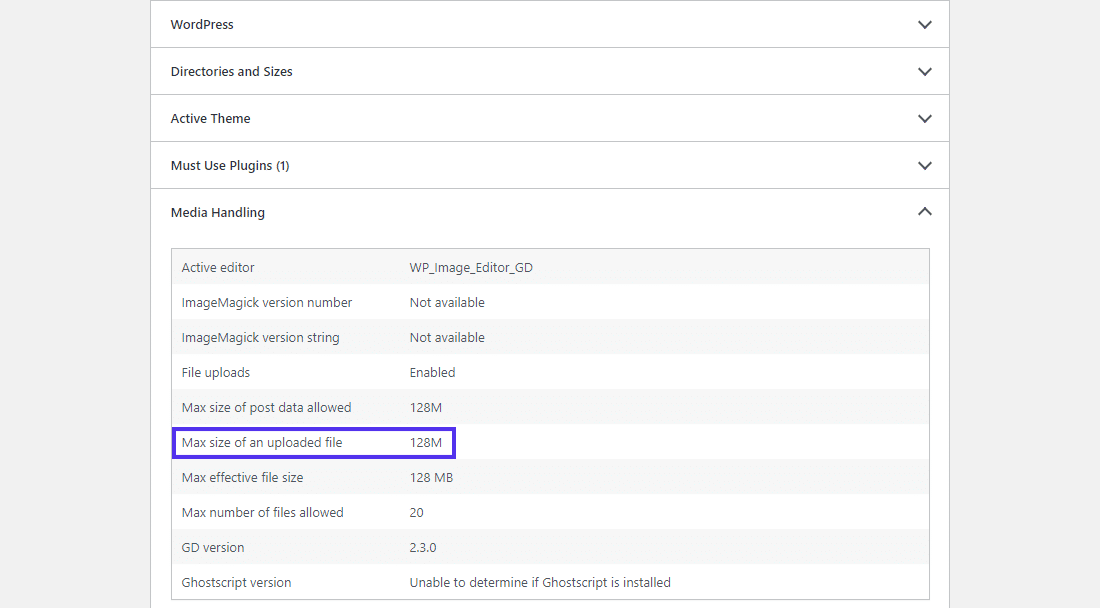
The 2d method is to wait under the Server dropdown. Y'all'll find many options related to your webserver's setup under here. Please search for the value for Upload max filesize constant to run across what it is. On this site, the max upload file size limit is 128 MB.
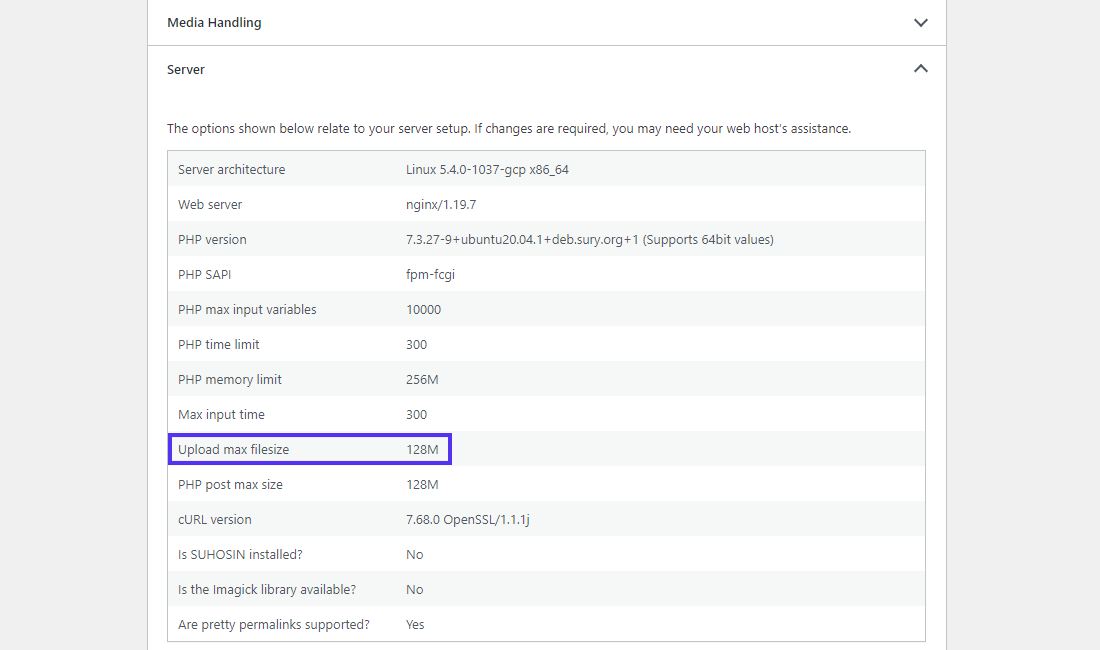
You can also see other PHP constants and their values, such every bit:
-
PHP post max size: Defines the maximum upload limit for Post requests. -
PHP memory limit: Defines the memory allocated for PHP. Information technology should be fix equal to or higher than theUpload max filesizelimit. Or else the upload will fail.
Your spider web host sets these options. Commonly, starter hosting plans will accept a lesser upload size limit than enterprise hosting plans. Some hosts may allow you to override these limits. Just in most cases, y'all may need your hosting provider's help (and perhaps a plan upgrade) to increase them.
Why Increase the Maximum Upload File Size in WordPress?
At that place are many reasons why yous may demand to increase your WordPress site's maximum upload file size. Here are the nigh mutual ones:
- Yous want to install a big theme or plugin directly through the WordPress admin dashboard.
- Updating your WordPress site regularly is a keen way to keep your readers engaged and render for more than. And that includes uploading new images, videos, audios, and other media regularly. However, that's non always feasible when in that location's a file size limit for your uploads.
- You desire to upload a large video or prototype as your site's background or header.
- Y'all program to sell digital files such as ebooks, photographs, videos, themes, and plugins directly from your site. Sometimes, these files can run up to hundreds of megabytes (or more than).
At present that we've covered the basics of max upload file size in WordPress, allow'due south learn how to increase it.
x Ways to Increment the Max Upload File Size in WordPress
In that location are many means you can fix the WordPress maximum upload size issue. We'll commencement with the easiest ones first, so we'll move on to the intermediate-level tutorials.
Contact Your Hosting Provider for Help
If you're facing issues with uploading files and file size limits, reaching out to your hosting provider for assistance is one of the quickest solutions. Increasing the upload limit is a footling task for tech back up, then most hosting companies can help you lot fix this issue rapidly.
Tinkering with your server or site configuration files can always be a claiming. Hence, we always recommend you lot try this method commencement.
If you lot're hosting your site with Kinsta, our knowledgeable support squad is just a click away and available 24/seven. To become started, go to your MyKinsta dashboard and click the conversation icon in the bottom correct corner.
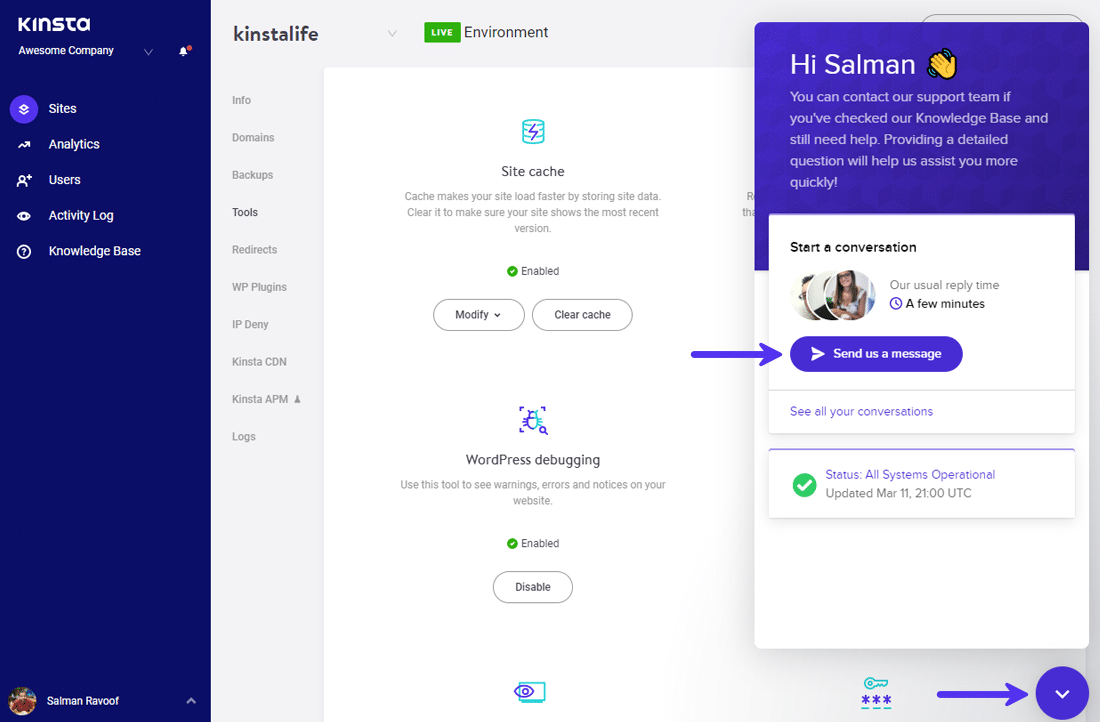
We have representatives to assist you in many languages, including English, Spanish, French, German language, Italian, and Portuguese.
Increase the Max Upload File Size in WordPress Multisite
If you're running a WordPress Multisite network, then you can alter the max upload file size for your network.
Beginning, head to your Network Admin dashboard, and so go to Settings > Network Settings screen. Here, whorl downward till you lot find the Upload Settings section. Y'all'll find the Max upload file size field in this area.
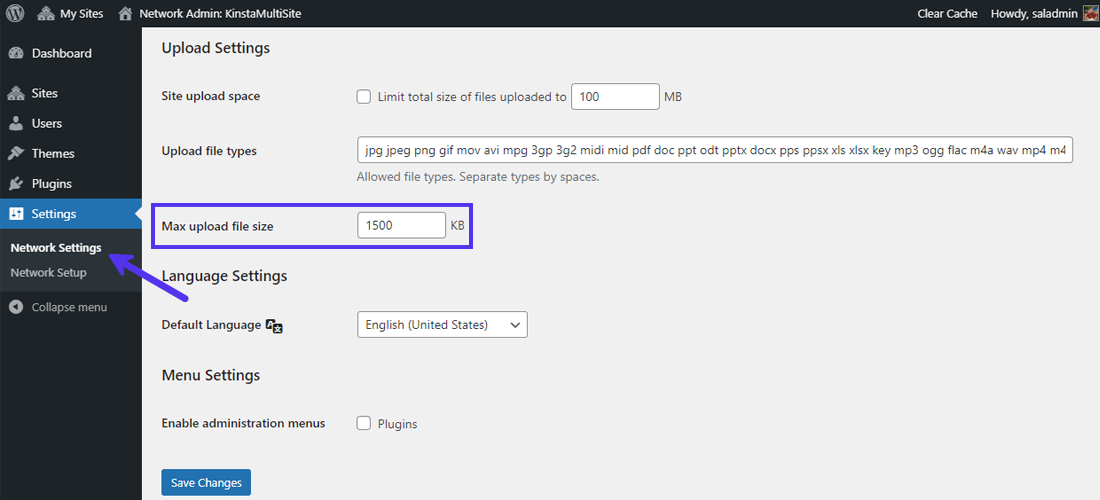
The default value of Max upload file size in a WordPress Multisite is 1500 KB (~ane.5 MB). You can modify this to a higher value and click the Salvage Changes button.
Note: You cannot circumvent the server-level max upload size limit from here. If the limit you set here is higher than the server's max upload size limit, the server will ignore it. You can use the methods described above to discover your webserver'due south configuration.
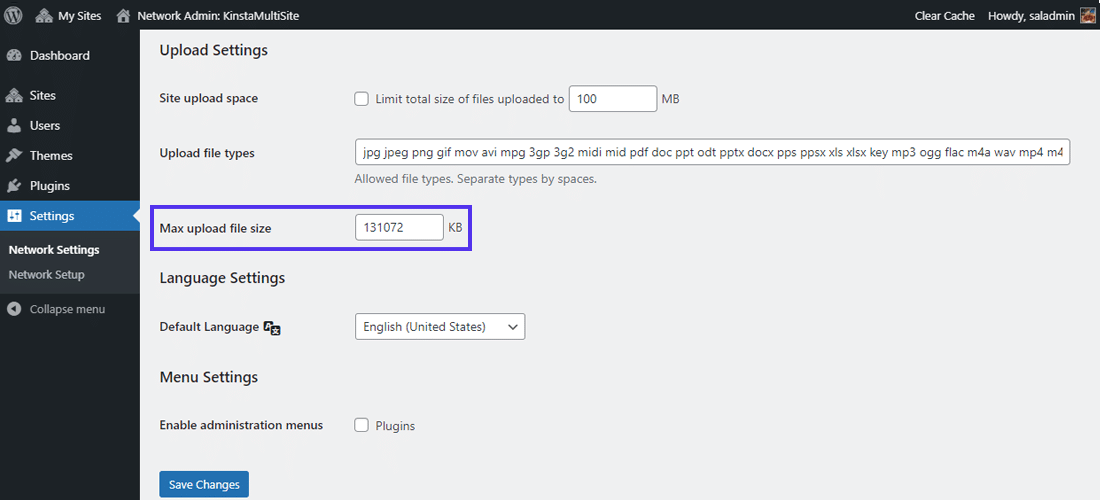
Hither, we've ready the new max upload file size to 131072 KB (~128 MB).
You tin can also limit the total size of files uploaded to an individual site in the Multisite network. However, it's disabled by default.
Update Your '.htaccess' File
If your webserver runs on Apache, you can update your site's .htaccess file to increase the max upload size in WordPress. You can find your .htaccess file in the WordPress site'southward root directory.
As per PHP documentation, iii PHP directives are responsible for how WordPress handles uploads. They are:
-
upload_max_filesize -
post_max_size -
memory_limit
We've already discussed them in the Site Health Info department above. Information technology would help if you modified these three directives' values to admit your file sizes. For instance, if the largest file you're planning to upload is 32 MB, we recommend the following settings:
-
upload_max_filesize = 32M -
post_max_size = 64M -
memory_limit = 128M
Detect, all the values utilize M instead of MB. That'south how PHP handles its directives.
Uploads can contain extra information in addition to the file itself. So, giving all other upload-related directives some animate space is a skillful idea. You lot can read our in-depth tutorial on how to meliorate PHP memory limit in WordPress for more data.
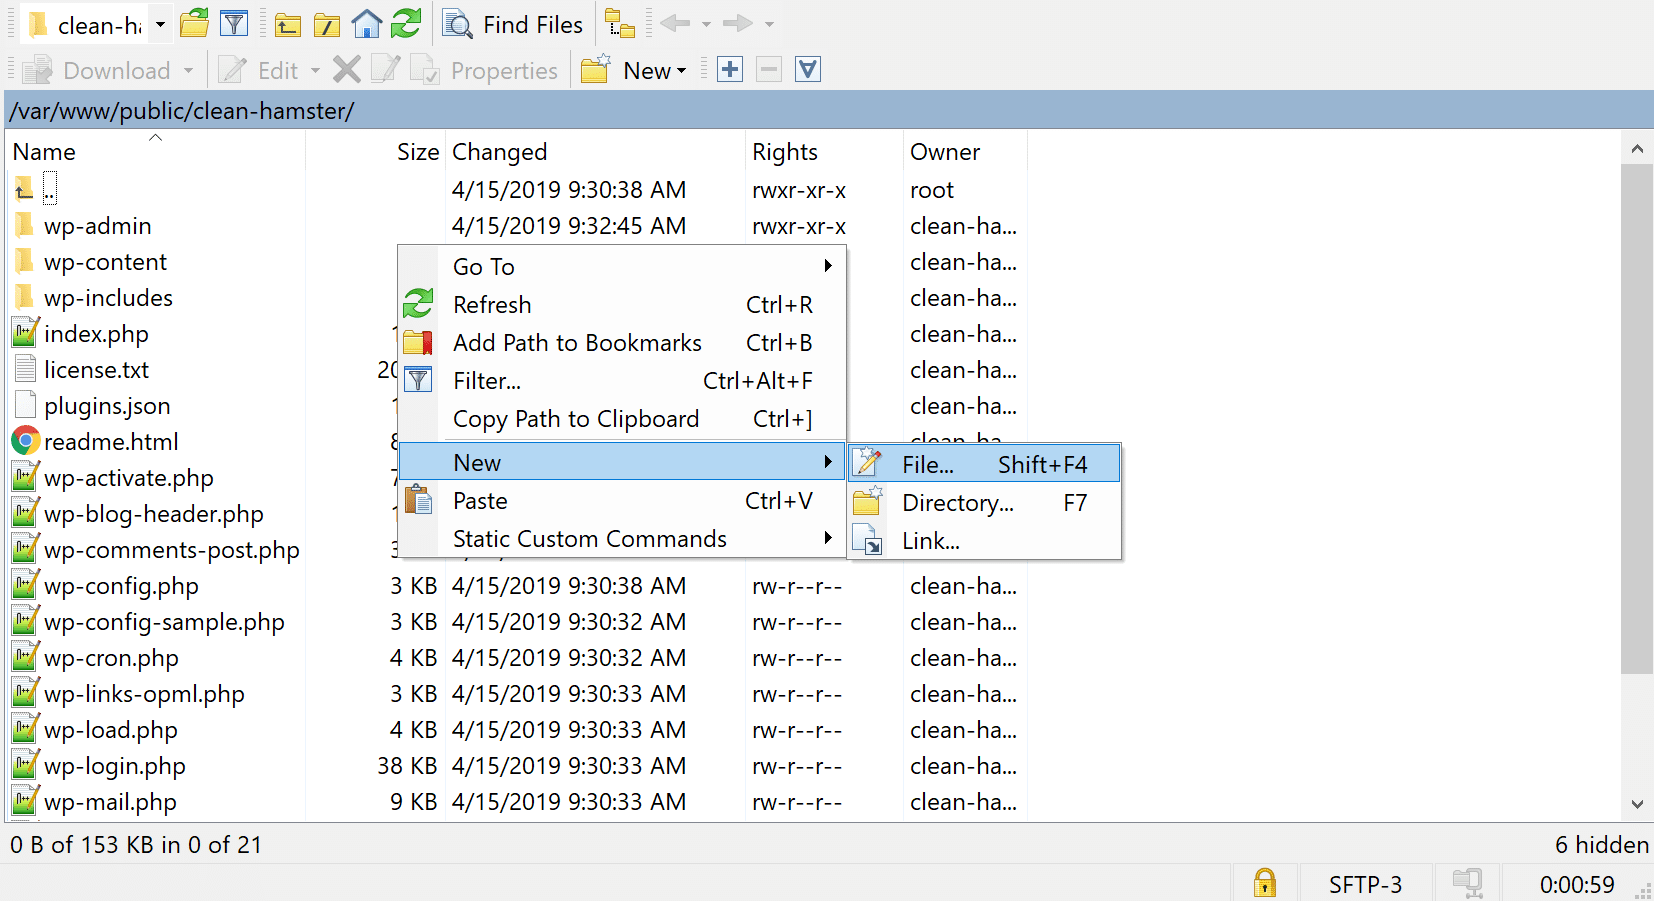
Access your .htaccess file via FTP/SFTP or your hosting provider'southward File Managing director.
Open the.htaccess file with a text editor or code editor, and then add together the following lawmaking:
php_value upload_max_filesize 32M php_value post_max_size 64M php_value memory_limit 128M php_value max_execution_time 300 php_value max_input_time 300 You can notice two other PHP directives in the in a higher place code: max_execution_time and max_input_time . They define how long a server spends on a single PHP chore. The bigger your uploads, the bigger the time spent will be. You need to set their values to a number that'southward appropriate for your apply case.
Note: You may go a 500 Internal Server Error after using the method above. Near probable, it'due south because your server is running PHP in CGI mode. In such cases, you cannot apply the above commands in your .htaccess file.
Create or Change the 'php.ini' File
The php.ini file is where you define changes to your default PHP settings. Typically, it contains directives that define file timeouts, max upload size, and resource limits.
Using SSH or FTP, you lot can find the php.ini file in your WordPress root directory. In some cases, you may non locate information technology at that place. Fret not! You can create a new file with the same proper noun in your site's root directory.
With a lawmaking or text editor, add together the following code to your existing or new php.ini file:
Subscribe Now
upload_max_filesize = 32M post_max_size = 64M memory_limit = 128M Don't forget to save your file subsequently making the changes. Some hosts don't permit you to modify PHP settings via this method. In such a instance, you tin go along to attempt the post-obit solution instead.
Create or Modify the '.user.ini' File
If your hosting provider has locked downwards the global PHP settings, they may have configured the server to piece of work with .user.ini files instead of php.ini files.
Like php.ini and .htaccess files, you tin find the .user.ini in your site's root directory. If you can't notice it, and so y'all can create a new .user.ini file in the same location. Follow the same process described in the previous method to create a newphp.ini file.
Adjacent, add the following code to your .user.ini file:
upload_max_filesize = 32M post_max_size = 64M memory_limit = 128M You lot'll notice that information technology'south a repeat of the previous method, except with a dissimilar filename.
Change PHP Options via cPanel
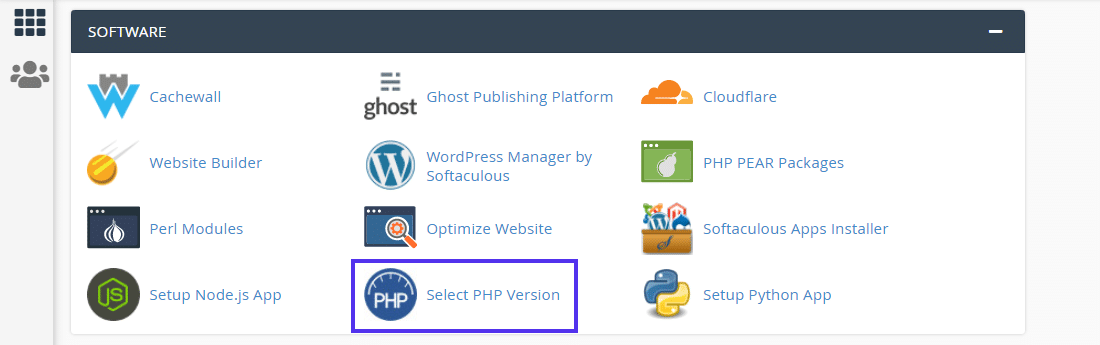
If your hosting provider uses the cPanel dashboard to help you manage your server and site configuration, y'all tin alter the max upload file size through its interface.
To get started, go to your cPanel dashboard, and select the Select PHP Version nether the Software section.
Hither, you can change your server's current PHP version and enable/disable many PHP extensions. Click on the Options link in the navigation carte to go to the PHP Options panel.
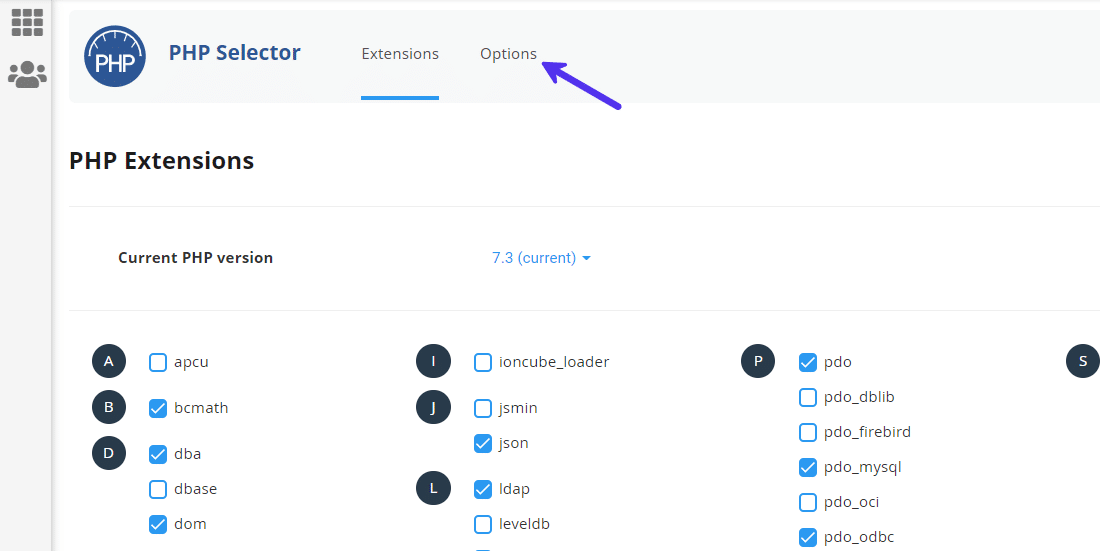
Roll downwards hither to change the values of PHP directives such as upload_max_filesize , post_max_size , memory_limit , max_execution_time , and max_input_time . The max values you can gear up here depend on your current hosting plan.
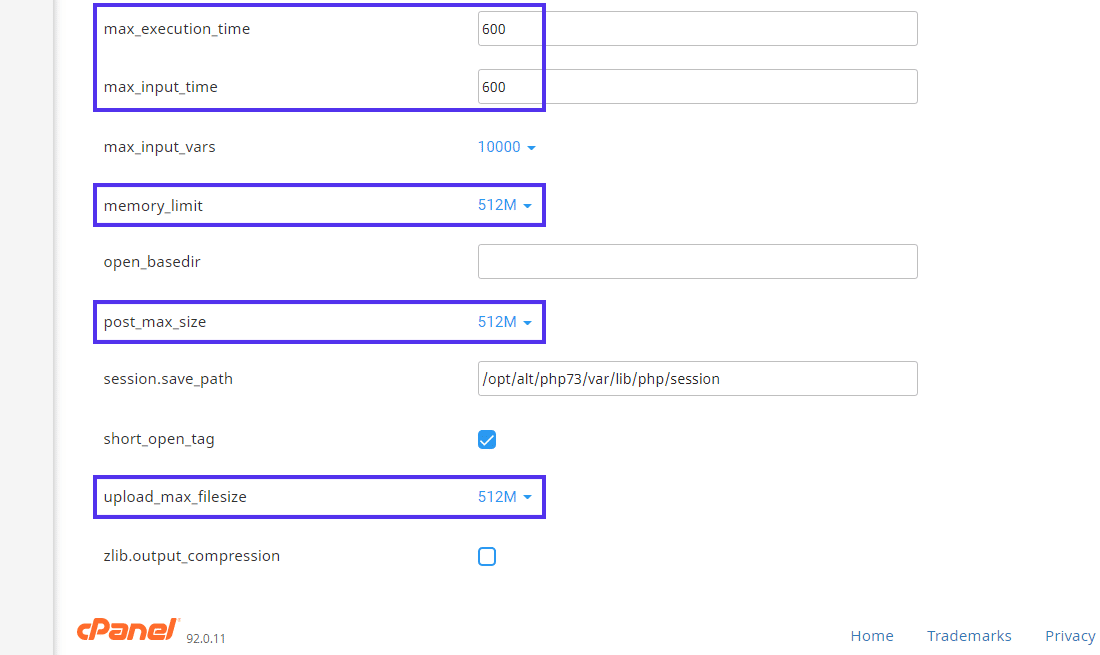
If yous have any doubts about these values, we suggest you contact your hosting provider. The latest cPanel dashboard saves changes automatically, so you don't have to click anything. But if you're using an older cPanel version, make sure to click the Save Changes button.
Increase the Max Upload File Size in Nginx
Nginx is another webserver like Apache, but it'southward also a lot more. Typically, Nginx can handle more than concurrent requests than Apache, making it a lot faster. Kinsta uses Nginx to power its functioning-optimized hosting solutions for WordPress.
If you're running your WordPress site on Nginx, you'll need to change both your php.ini and nginx.conf files. We've dealt with the old file before. The latter 1 is called an Nginx config file.
On an Nginx server, yous can find the php.ini file at /etc/php/7.4/fpm/php.ini . Depending on which PHP version you lot've installed, the exact path may vary slightly.
upload_max_filesize = 64M post_max_size = 128M Yous don't have to set the memory_limit in the higher up file as Nginx handles information technology differently. For more, you tin can cheque out this Stack Overflow thread. Afterward saving your php.ini file, enable the changes by restarting PHP-FPM using the below code in your terminal:
sudo service php7.4-fpm restart Once more, the exact lawmaking may vary slightly depending on the PHP version installed on your server.
Next, apply Nginx'southward client_max_body_size directive to ready the new max upload size limit. Yous need to declare this directive in the nginx.conf file, which y'all can find at /etc/nginx/nginx.conf .
Y'all can declare this directive inside the http {...} block, the server {...} block, or the location {...} block.
Setting information technology in the http cake will bear on all the sites/apps hosted on this server.
http { ... client_max_body_size 128M; } Defining it in the server block will only affect a specific site/app hosted by this server.
server { ... client_max_body_size 128M; } The location block simply affects the specified directory (e.thousand. files, uploads) within a site/app.
location /files { ... client_max_body_size 128M; } Don't forget to save the file and restart Nginx to utilise the changes. To do that, y'all can utilise the following control in your final:
sudo service nginx reload If yous're a Kinsta customer, you lot tin can't access your Nginx config straight. Yet, you lot can reach out to our support team, and they tin quickly brand the changes for you.
Use the WordPress 'upload_size_limit' Filter
WordPress two.v introduced the upload_size_limit filter, which filters the maximum upload size immune in php.ini. Even WordPress uses this filter to show you the max upload size immune, like in the Media Library and Site Health Info screens.
Below is an example of this filter in action from WordPress contributor Drew Jaynes. It defines the upload size limit for all non-admin roles.
/** * Filter the upload size limit for not-administrators. * * @param cord $size Upload size limit (in bytes). * @return int (possibly) Filtered size limit. */ part filter_site_upload_size_limit( $size ) { // Fix the upload size limit to ten MB for users lacking the 'manage_options' capability. if ( ! current_user_can( 'manage_options' ) ) { // 10 MB. $size = 1024 * 10000; } return $size; } add_filter( 'upload_size_limit', 'filter_site_upload_size_limit', twenty ); The higher up code uses WordPress' manage_options adequacy to set up this limit only for non-admins. You can modify the code to target specific user roles or user ids. Read our in-depth WordPress roles and capabilities article for more information.
Use a WordPress Plugin
Messing with lawmaking using SSH or FTP/SFTP is not for anybody. If you're not comfy with writing or editing lawmaking, y'all can use a WordPress plugin instead.
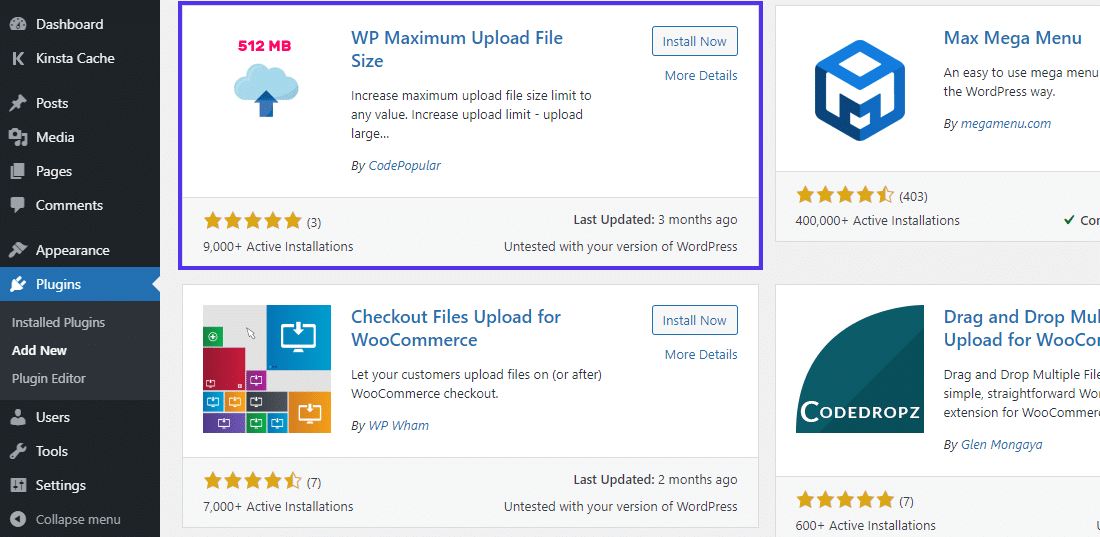
We'll be using the WP Maximum Upload File Size plugin here. Equally of writing this, it's the just up-to-date plugin on the WordPress plugin repository that helps you get this washed.
To go started, install and activate the WP Maximum Upload File Size plugin. Side by side, go to its settings screen in your WordPress dashboard. Here, you lot can come across the maximum upload file size set by both your hosting provider and WordPress.
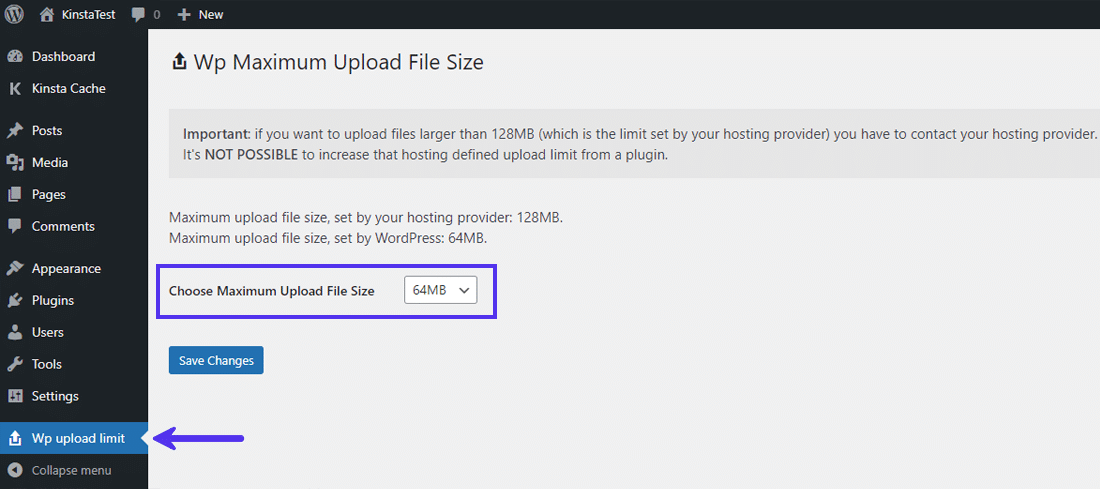
Here, yous tin run across that the maximum upload file size set past WordPress is lesser than that gear up by your hosting provider. Hence, you lot can creepo it up by choosing the Maximum Upload File Size with the dropdown presented.
Note: If you want to set a max upload file size limit that's larger than the i fix by your hosting provider, it's not possible to do it via this plugin. For that, you need to contact your hosting provider.
Upload Files via FTP/SFTP
Are you lot however struggling with all the higher up methods? Or with your hosting provider to accept them enhance the upload file size limit? You can always upload big files via FTP/SFTP.
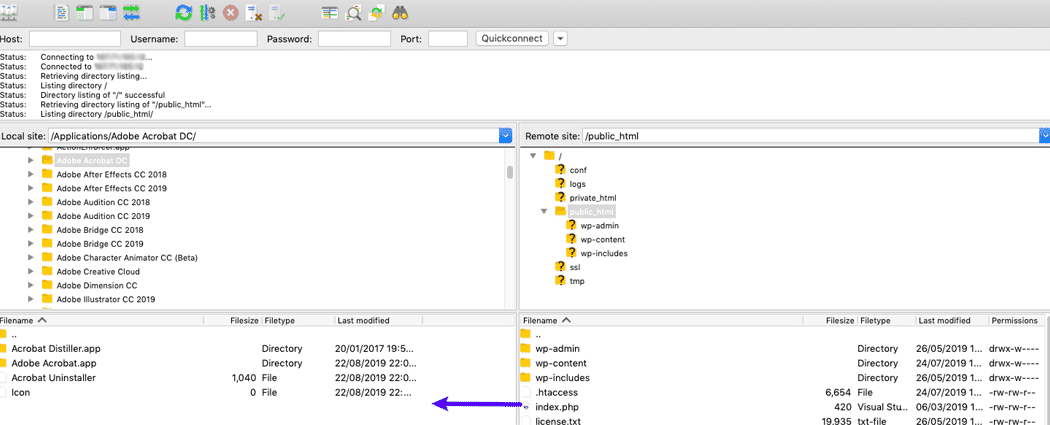
If you have a lot of large files to upload, this is the fastest method. You tin read our in-depth tutorial on how to bulk upload files to the WordPress media library for more information.
Sometimes, WordPress doesn't recognize files uploaded via FTP/SFTP. If that's the case, you can use the free Add From Server plugin to import the uploaded files into WordPress.
Alternatively, yous can exercise the same straight from the control line past importing images using WP-CLI. The wp media import command allows you to create attachments from local files or URLs.
Don't Edit the 'wp-config.php' File
Editing the wp-config.php file doesn't piece of work anymore. We're calculation it here considering we've plant many web tutorials that list it every bit a legitimate way to increase the max upload size in WordPress.
It involves going to your site'due south root directory via FTP/SFTP or SSH and then editing the wp-config.php file.
You're suggested to add the post-obit code to the wp-config.php file:
@ini_set( 'upload_max_size' , '64M' ); @ini_set( 'post_max_size', '128M'); @ini_set( 'memory_limit', '256M' ); It fails to piece of work considering you can only use the ini_set() function to set PHP directives that belong to the PHP_INI_ALL child-bearing manner.
As upload_max_size and post_max_size belong to the PHP_INI_PERDIR changeable way. You tin can only fix them via php.ini, .htaccess, http.conf, or .user.ini.
If y'all've tried this method before without seeing any results, now you know why information technology fails.
Verify Your WordPress Site'due south New Max Upload File Size
Finally, it's time to verify whether the new max upload file size limit is implemented in your WordPress site. To do this, follow the aforementioned process we discussed above to check the max upload file size in WordPress.
Go to your Media Library in the WordPress dashboard and check whether the max upload file size limit has inverse.
Yes, it has changed. That'southward a success!
You tin can likewise go to the Site Health Info console and check for the same under Media Handling and Server dropdowns.
Summary
As yous've seen, increasing the maximum upload file size in WordPress isn't also complex. Whether yous're building a media-heavy portfolio site or installing a large theme, it'south just a affair of knowing where to wait for and what commands or tools to use.
In most cases, reaching out to your hosting provider should be enough. Notwithstanding, if you're stuck with a troublesome host, we've shown y'all some culling methods you can effort before migrating to better hosting.
Become uploading!
Did we embrace it all? If you've experienced a stubborn case of upload file size limits, let us know how yous managed to fix information technology.
Save fourth dimension, costs and maximize site performance with:
- Instant help from WordPress hosting experts, 24/7.
- Cloudflare Enterprise integration.
- Global audience reach with 34 data centers worldwide.
- Optimization with our built-in Application Performance Monitoring.
All of that and much more, in one programme with no long-term contracts, assisted migrations, and a 30-day-money-back-guarantee. Check out our plans or talk to sales to observe the plan that'southward right for you.
Source: https://kinsta.com/blog/increase-max-upload-size-wordpress/
Posted by: adolphyesithisces.blogspot.com
0 Response to "Does Cascade Server Have A Max Upload File Size?"
Post a Comment